SEARCH


|
|
|
|


by Graham Daly
Back in July 2015, I wrote a post on my personal blog which focused around the benefits of using the RAW file format and how is it possible to turn good captured into great looking images. I thought it would be good to share this same information on the 1x Magazine so that of our readers can gain a true understanding and appreciation as to why RAW shooting really is the best way to go about producing your own stunning images. Below is the content of the original article as found on my site here.
Why shoot in RAW?
There are several reasons for this. I will not go into all of them in this article as I will cover that in more detail in a future post. Suffice it to say, the RAW file format is the best format of image that your digital camera can produce so why not use it and utilize your camera's imaging capabilities to the maximum.
RAW files contain more uncompressed data than their compressed JPEG counterparts. This allows for much greater flexibility when it comes to developing or processing your images in your photo processing software of choice, a.k.a the digital darkroom. RAW files offer a much greater dynamic range than compressed JPEG images and so you can recover a lot more data both in the highlight and shadow areas of an image if necessary.
Educating yourself with respect to processing RAW files in your given photo processing software (Lightroom, Photoshop, CaptureOne, NiK Collection, etc...) and honing your post-processing skills with undoubtedly enable you to produce better looking images.
RAW Processing - Turning good captures into great images
Now, it goes without saying that top quality post-processing skills alone is not going to make a great image. Of course someone who is skilled in Photoshop will probably be able to improve on any image they are faced with, however nobody can turn a bad image into a good image. Either the image consists of good composition, lighting and subject matter or it does not.
With the above in mind, I can say this, that if the photographer puts in the time and effort to get things right at the capture stage and successfully captures a good undeveloped/unprocessed image on their camera in a RAW file format, then if that same photographer puts in the same time and effort at the post-processing stage, they will be able to turn their good captures into great images.
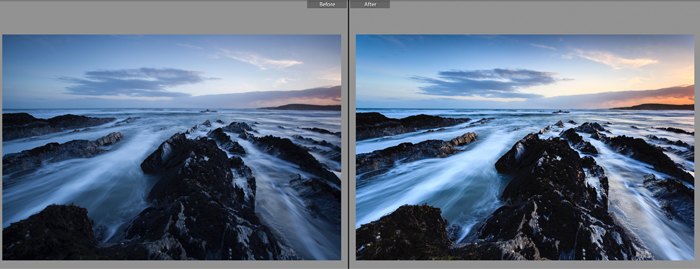
Below is a Before & After example of one of my images showing what the RAW file looked like as well as what the final image looked like once I had developed and processed the RAW file.

RAW file on left shows how RAW files initially lack sharpness, clarity and colour saturation whereas the image on the right consists of a much sharper image with better colour tonality.
Some things to know about RAW files
Unlike JPEGs which contain compressed data that was processed by the camera, RAW files consist of uncompressed and unprocessed data. As such the RAW files coming off cameras will initially look rather flat and dull and this is because they have not been processed by the camera. When shooting in JPEG the camera will automatically adjust the sharpness, clarity, contrast and as well as colour tonality and saturation within the image. This is why JPEGs do look a lot nicer when coming off the camera than an unprocessed RAW file.
However, due the increased amount of data within the unprocessed RAW file, the photographer now has full control over how the image will ultimately look. The photographer will be able to choose how much contrast is added and where it is added. They can chose to adjust the exposure or recover detail from the highlights and shadow areas if they like. They can even chose what parts of the image they want to sharpen. As well as this, the photographer can adjust the white balance and colour temperature of the image, something which would have been hard coded into the image if captured in a JPEG format.
So RAW files offer much more creative control to the photographer.
The difference a little processing can make
While it is true that some people probably over-process their images, in reality all images do need to be processed in some capacity or form. How much processing is needed or applied is completely at the discretion of the photographer but my personal mantra is that one should only need to process the image to the point where the resulting image reflects the best possible data that was contained within the RAW file.
I want to stress at this point that when I say "processing the RAW file", I am saying exactly just that. I am not talking about image blending, applying HDR techniques or cloning in or out skies or other elements. Processing the RAW file is simply extracting and adjusting the very best data from within that single RAW file.
What exact processing is needed will very much depend on the particular image and data but several actions would need to be performed to every RAW image.
These actions would include:
* Lens Corrections - applying a lens profile so that any lens distortion or chromatic aberration is resolved
* Dust spot removal - identifying unwanted dust/dirt spots within the image and cloning them out
* Global adjustments - adjustments that affect the whole image, such as white balance, colour temperature, contrast, exposure, shadows, highlights, etc...
* Local adjustments - adjustments that affect only selected parts of an image, such as increasing the shadow detail on a particular object or reducing the exposure (burning) in the sky portion of the image
* Image sharpness - By default all RAW images opened within Adobe Lightroom or Photoshop automatically have the sharpness level increased to 25. This is because the application developers know that RAW images are naturally lacking sharpness and thus they add a minimal amount before any further work is done to the image. Realistically though, for most situations you would want to be increasing the sharpness level to at least 40, sometimes even further
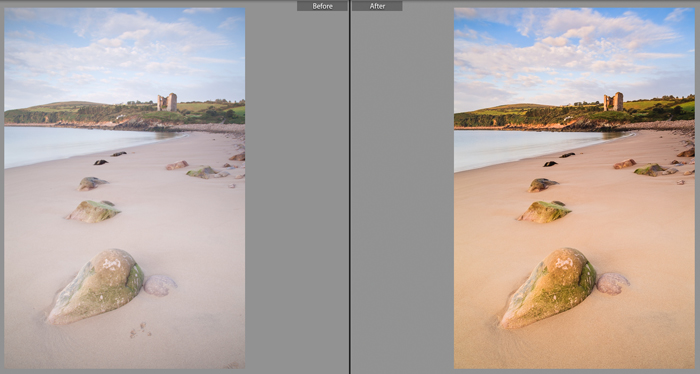
Before & After - examples of how basic tweaks to the RAW file helped to produce much better images

The original RAW file on the left was obviously lacking sharpness, clarity, contrast and colour saturation as well as containing some minor lens distortion and chromatic aberration. Plus it was quite hazy at that particular moment in time when shooting and so I knew there and then that I would end up removing that haze when it came time to processing the image.
The file on the right was the result of some minor processing tweaks including lens correction, global highlights, exposure and contrast adjustments as well as an increase the vibrancy and selective sharpening (masking) being applied. You will notice that I cloned out some unwanted imprints on the sand in the immediate foreground, which were caused accidentally by me when I placed my tripod legs in the wrong place!

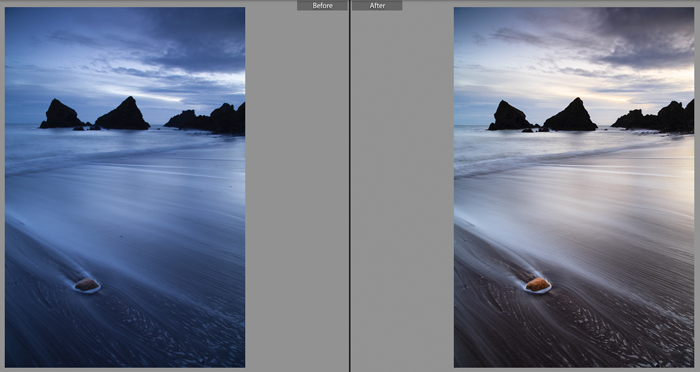
Again, as can been seen in the above example, the original RAW file on the left above was lacking sharpness, clarity, contrast as well as containing some minor lens distortion and chromatic aberration.
I corrected these in post-processing by applying the necessary lens profile to fix the lens distortion and chromatic aberration issues. I then globally adjusted the exposure, shadows, contrast, clarity and the white balance.
Although the colour temperature as seen in the original image was more closer to reality with respect to the conditions that were present when I was shooting, I simply just did not like the very cold tone that the image had so I opted to warm it up a little in order to take out some of that blue tone. I also felt that the single blue tone throughout the entire image caused it to appear very two-dimensional and I knew that adding a bit of local color and contrast adjustments in both the sky and the mid-ground would help the image to really stand out.
The final local adjustment that I felt was really essential was to increase (dodge) the exposure of the small rock in the foreground as well as increasing the saturation. I wanted the rock to really stand out from the darker sand that lay beneath it. This was really important as the small rock was the first element in the image that the viewer would see. Never underestimate the importance of foreground interest!
I think you will agree that the resulting processed image on the right is far superior and much more interesting looking than the original RAW image on the left.
Hopefully this article was helpful in showing you some of the advantages of shooting in the RAW file format and the ability it will give you to take your photography and images to the next level.
 | Write |
 | Henk van Maastricht PRO A nice explanation to shoot in RAW Yvette, which last 1x photographer must now change tack.! |